Getting started:
1. Preconditions
You should have installed pyhton2.7 and pip on you local machine or on the server you want to deploy the service. You should also set up a QLever backend on this machine.
If you already have QLever installed you may start the QLever instance by running the following command in the QLever folder.
./ServerMain -i [path/to/source] -p [port] -t -l
2. Installing
The UI comes with a special backend that serves several features like the auto-completion engine and the backend management system. To setup the backend correctly download the source and switch into the "qleverUI" folder. Run the following commands in you command line to install the requirements and to setup the database:
pip install -r requirements.txt
./manage.py migrate
3. Setting up an account
You will need an administrator account for qleverUI in order to configure a backend for the UI service.
Simply run the following command to setup your own superuser account in your database:
./manage.py createsuperuser
Follow the instructions printed.
If you forget you credentials you can create a new user at anytime by running this command again.
4. Starting the servicce
You may start a test-server on port :8000 with the following command (inside /qleverUI/):
./manage.py runserver [host]:8000 --insecure
Alternatively you may want to setup the system behind a running apache or nginx server with Mod WSGI to create a persistant production environment.
Don't forget to add the desired hostname in "ALLOWED_HOSTS" and disable DEBUG mode in settings.py for the productive setup.
5. Setup new backends
Open [host]:8000/admin or append "/admin" to the chosen URL in order to get access to the admin panel.
Login with your admin credentials and chose "backends" from the given menu.
Choose "Add Backend" and fill in the information of your running QLever instance. The UI interface will explain you the required information and settings. Qlever UI needs those information for doing it's preprocessing steps.
QLever UI supports multiple backends. You may want to repeat this step for every qlever backend you want to use within your QLever UI instance.
6. First run
You may access your IP / hostname on the given port directly in your web browser now. QLever UI will automatically start it's preprocessing work and tells you when it is ready to start.
If you have not enabled "Use QLever Preprocessing" in your backend you need one additional step:
QLever UI will create a new qlui_data.nt file with additional data that sould be added to the QLever index. Append this file to your QLever source and reindex:
cat qlui_data.nt >> [/path/to/source] && [/path/to/qlever]/IndexBuilderMain -i [/path/to/index] -n [/path/to/source]
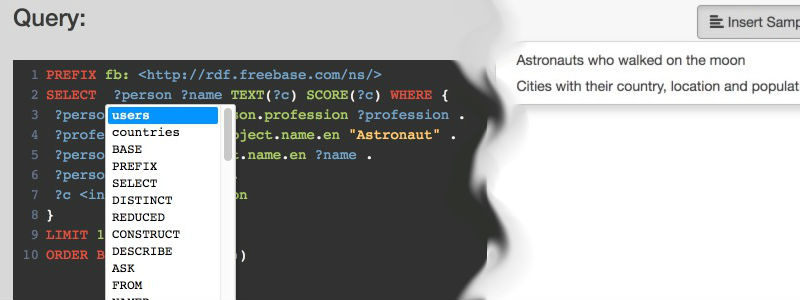
Highlights of our UI
- SPARQL syntax highlighting
- Autocompletion (Ctrl + Space)
- Context-sensitive suggestions
- Data prefetch and discovery
- SPARQL template patterns
- Line numbers and tabbing
- Interactive placeholders
- Supports multiple backends
- Supports storage of samples
- Dark- and light-theme
- ...
Working with the UI:
Try it on your own!